facebook twitter pinterest instagram
  • Home
  • About
  • DIY
    • Diy home decor
    • diy events
      • Birthdays
      • baby bridal shower
      • weddings
    • Diy holidays
      • Christmas
      • Halloween
      • new years
      • Thanksgiving
      • Valentine Day
    • Diy Kids
  • Home Decor
    • before And after
    • Diy home decor
    • Decor tips
    • High-low
    • home tour
    • Trends
    • One room challenge
  • By Rooms
    • Bathroom
    • Dining room
    • outdoor
    • Kids room
    • kitchen
    • laundry
    • living room
    • Office
    • Bedroom
  • Life
    • Entertaining
    • Family
    • Fashion
    • recipe
    • travel
    • Gift Guide
    • Spotlight
  • Shop
    • weekly faves
    • Reviews
    • Free printable
  • Design Studio

Harlow & Thistle

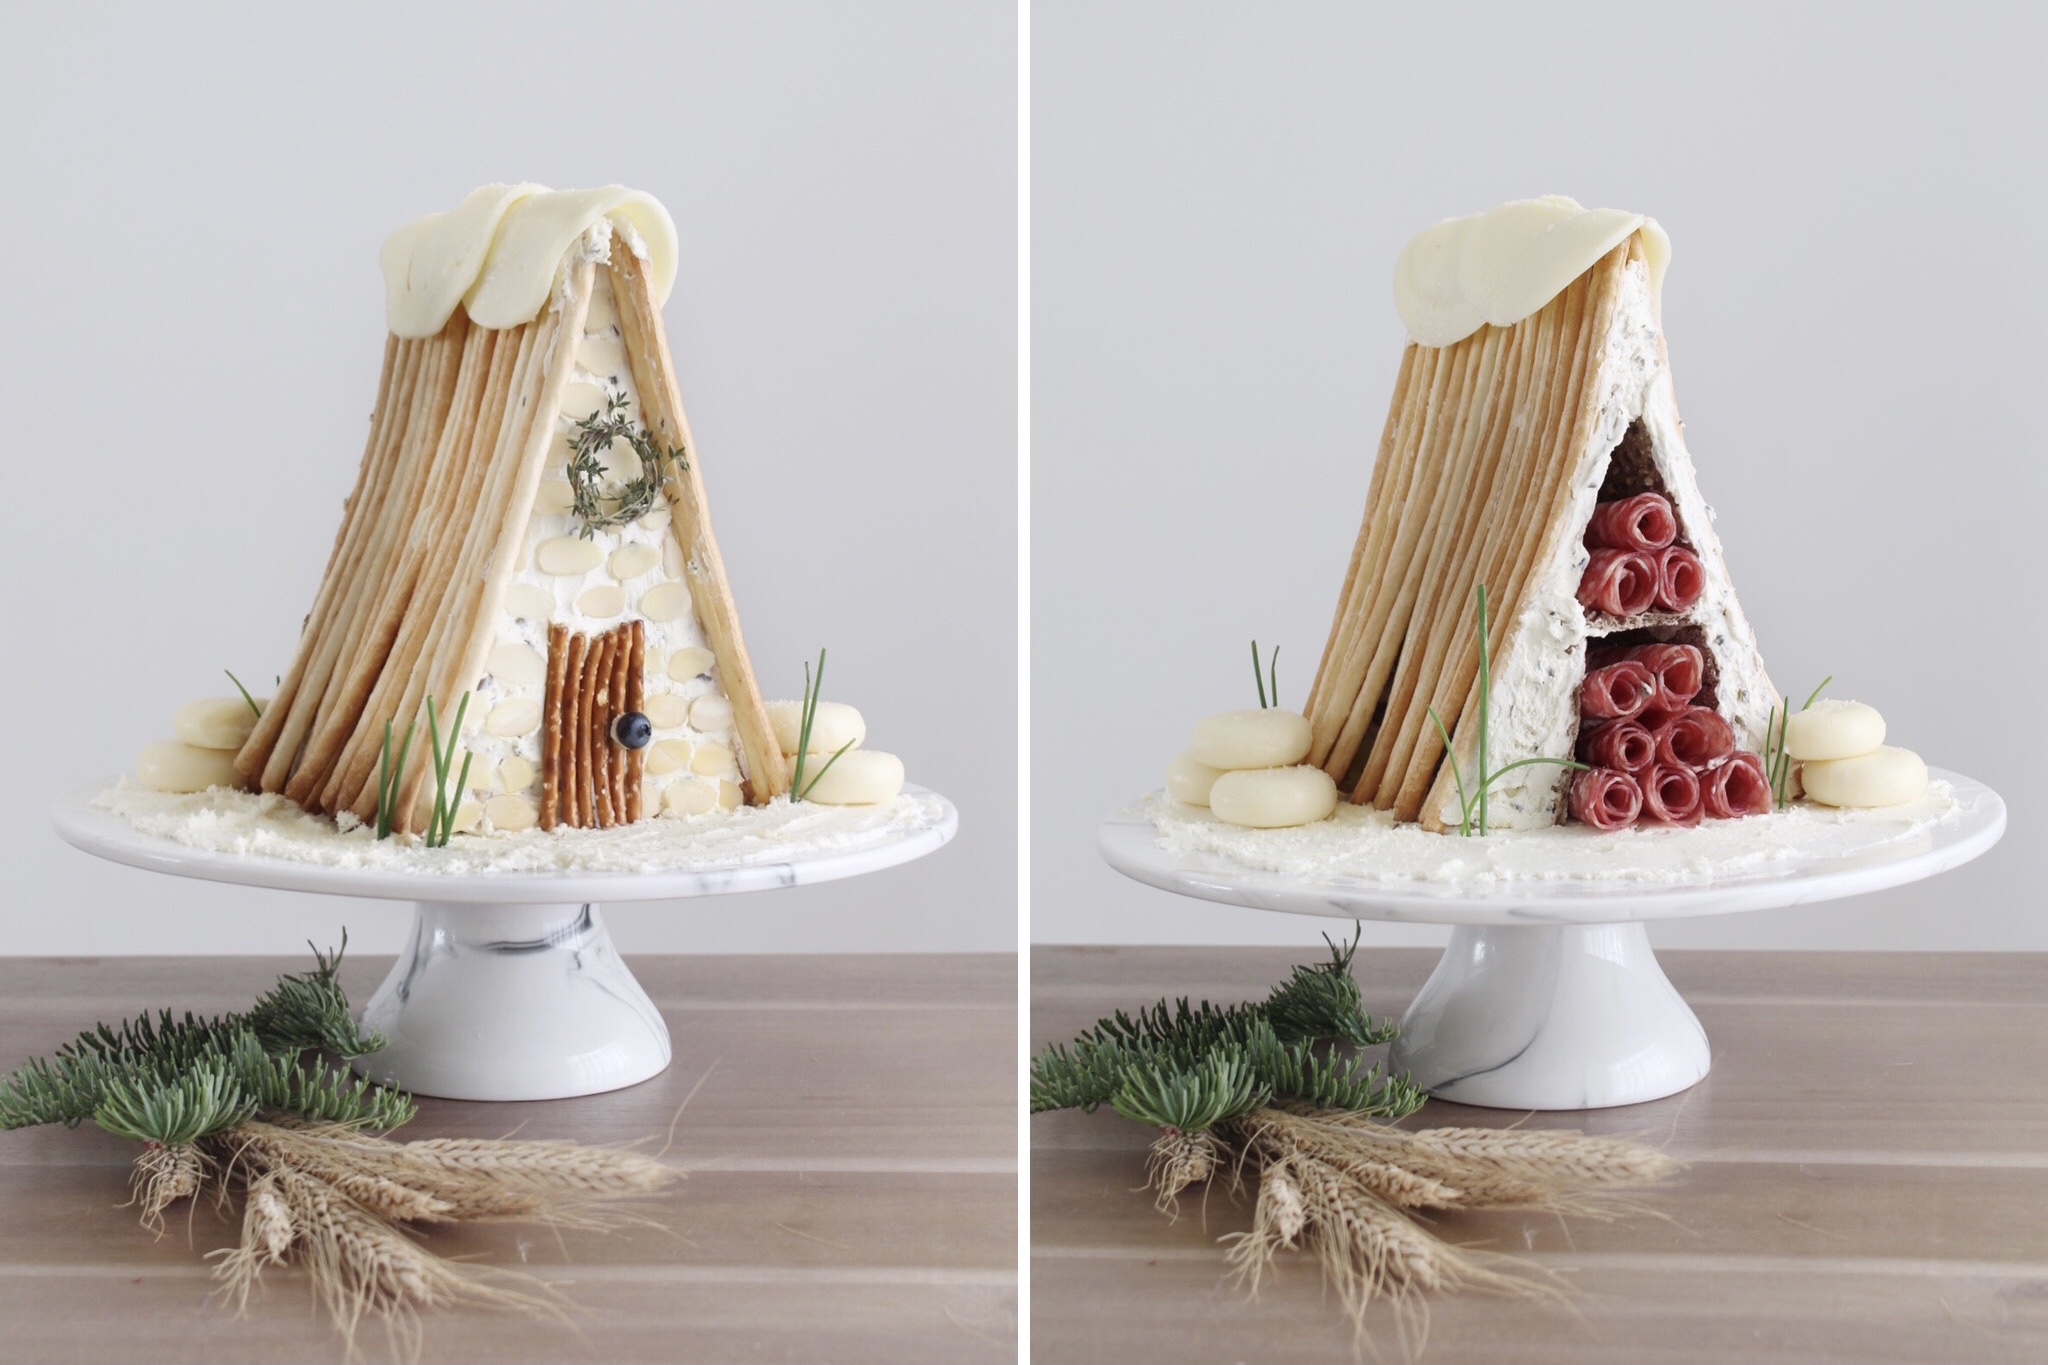
Delight your family this holiday season with a beautiful and savoury charcuterie chalet on your Christmas table. This gingerbread house alternative is all the rage right now and in partnership with Kitchen Stuff Plus we're jumping on board to share our take on this salty treat. Admittedly our charcuterie chalet is a little light on meat and a little heavy on the cheese however we plan to use this chalet as a centerpiece on our charcuterie table so we wanted to elevate it a bit. We love the A-frame cabin shape, it adds a modern touch and is easier to make. Here's how to make a charcuterie chalet:

how to make a charcuterie chalet

how to make a charcuterie chalet

11:56:00 No comments
Admittedly I'm not much of a baker. The thought of baking a whole wack load of Christmas goodies scares me. This year I thought I'd dip my toe into Christmas baking with something familiar - cake.  Funny story, the first birthday I celebrated with my husband I baked him a cake from scratch (with a little help from my best friend). The cake was delicious but as it turns out my husband's not really into birthday cake, something I learned years later. Anyway, since I know how to make cake from scratch I thought a Buffalo Plaid Cake in a Jar would be a nice unique Christmas treat for our neighbours and friends (hmm I suppose not really for my husband but oh well). As part of the Modern Handmade home series we've partnered with Kitchen Stuff Plus to share with you some baking and gift ideas below.  

This is me at the beginning of the process - I wore heels because I was anxious. Everyone bakes in heels right?  Psst, that cute little buffalo plaid apron and those festive oven mitts are from Kitchen Stuff Plus!


Buffalo-plaid-cake-in-a-jar-1

I got all my supplies from Kitchen Stuff Plus, measuring cups, bowls, whisks, measuring spoons and some awesome holiday tea-towels. 

Buffalo-plaid-cake-in-a-jar-3

Okay, so to start I made three very basic cakes (2 white and 1 chocolate). I followed a recipe online because I'm no where near the level of creating my own recipe.

Buffalo-plaid-cake-in-a-jar-5

I left one cake white, added a very small amount of black food colouring to the other white cake and a very small amount of black food colouring to the chocolate cake. I really don't like the taste of food colouring (it gives me migraines) which is why I decided to make a black and white buffalo plaid cake in a jar rather than a red and black lumber jack plaid cake (required too much food colouring).

I poured the cake batter into three greased baking sheets from Kitchen Stuff Plus. 

Buffalo-plaid-cake-in-a-jar-7

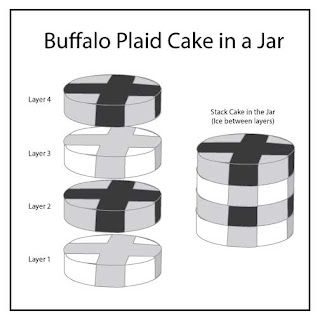
Once they were done I took them out of the oven and let them rest on a cooling rack.  Then I used some circle cookie cutters (you could also use the lid of the mini mason jar) and cut the cakes into a bunch of small circles. To assemble the buffalo plaid cake in a jar, I followed the pattern below. I used a measuring spoon to press the cake down on each layer and I applied a thin coat of icing between each layer for taste and to hold it together (I was careful not to put too much as I didn't want it oozing out the sides).

Buffalo-plaid-cake-in-a-jar-8

Buffalo-plaid-cake-in-a-jar-9

Buffalo-plaid-cake-in-a-jar-pattern

On the top of the cake I iced it with a fair bit of icing and then closed the mason jar lid.

Buffalo-plaid-cake-in-a-jar-10

Buffalo-plaid-cake-in-a-jar-11

buffalo plaid cake in a jar


Then I used some cheese cloth, twine and some cute dessert forks I got from Kitchen Stuff Plus and decorated the top of the mason jar.

Buffalo-plaid-cake-in-a-jar-12

Buffalo-plaid-cake-in-a-jar-15

I have to say I was pleasantly surprised by the way these turned out so I decided to deliver a few to some neighbours and serve some to friends at a little festive gathering.

Buffalo-plaid-cake-in-a-jar-17

buffalo plaid cake in a jar

Buffalo-plaid-cake-in-a-jar-18

Buffalo-plaid-cake-in-a-jar-19

I put this nice buffalo plaid table runner and some ornaments from Kitchen Stuff Plus on my table for decoration. It was just enough.

Buffalo-plaid-cake-in-a-jar-20

I also decided to have a small gift just in case we play a game or something. I picked up these great gold cheese knives from Kitchen Stuff Plus and decided to wrap them in the left over cheese cloth and twine - I added a Christmas Tree ornament as a bow.

cheese-cloth-gift-wrap

Kitchen Stuff Plus not only has everything you need to be a baking super star, they also have the widest assortment of Holiday Ornaments I've ever seen; some cute, some traditional, some for the kids, the list goes on and on. Plus they have a BOGO going on right now! I love how cute these ones look on my little tree.

mini-christmas-tree-decorations

nordic-christmas-tree-ornaments

Well I'm all set for our Holiday gathering! Time to relax! Happy Holidays!

Be sure to check out the other bloggers in the Modern Handmade Home Series Thalita from The Learner Observer, Lindi from Love Create Celebrate, Colleen from Lemon Thistle and Gemma from The Sweetest Diggs.

holiday-baking-and-gift-ideas

This post is in partnership with Kitchen Stuff Plus. All expressed opinions are my own.

Buffalo-plaid-cake-in-a-jar-21

19:39:00 No comments
It's officially fall so I think I'm safe to post this (I know some people get their knickers in a knot when bloggers prematurely post pumpkin spiced stuff). We moved into a new house at the end of August and before we moved I did test run of my Thanksgiving table. I did a test run because half my kitchen supplies were headed to storage during the move and I wanted to ensure I could still have a thanksgiving dinner with a limited assortment of serve ware. Luckily we partnered with Kitchen Stuff Plus as part of the Modern Handmade Home Series and they have a whole slew of 'oven to table' bake ware that cut my required pots and dishes in half plus they're so pretty they also make a lovely thanksgiving table setting (no need for more decor).

Thanksgiving-Table-Setting-Oven-to-Table-Kitchen-Stuff-Plus-Harlow-And-Thistle

I kept the table setting very loose and organic, no formal napkin folds or anything. My son loved helping, he always has great ideas and isn't afraid to tell mommy when something doesn't look right.


Thanksgiving-Table-Setting-Oven-to-Table-Kitchen-Stuff-Plus-Harlow-And-Thistle-3

Kitchen Stuff Plus has a 10 pack of dish towels with great patterns and colours. I used them as pot coasters and napkins around the table. The Tuscana Fluted Bakeware from KSP has a wonderful vintage feel, especially the onion soup bowls and they pair well with KSP cutting boards, Italian glass wear and marble platters. I loved how this all came together.

Thanksgiving-Table-Setting-Oven-to-Table-Kitchen-Stuff-Plus-Harlow-And-Thistle-4

Thanksgiving-Table-Setting-Oven-to-Table-Kitchen-Stuff-Plus-Harlow-And-Thistle-5

Thanksgiving-Table-Setting-Oven-to-Table-Kitchen-Stuff-Plus-Harlow-And-Thistle-7

Thanksgiving-Table-Setting-Oven-to-Table-Kitchen-Stuff-Plus-Harlow-And-Thistle-8

Thanksgiving-Table-Setting-Oven-to-Table-Kitchen-Stuff-Plus-Harlow-And-Thistle-9

Thanksgiving-Table-Setting-Oven-to-Table-Kitchen-Stuff-Plus-Harlow-And-Thistle-9a

Thanksgiving-Table-Setting-Oven-to-Table-Kitchen-Stuff-Plus-Harlow-And-Thistle-10

Thanksgiving-Table-Setting-Oven-to-Table-Kitchen-Stuff-Plus-Harlow-And-Thistle-11

Be sure to check out the other bloggers in the Modern Handmade Home Series Thalita from The Learner Observer, Lindi from Love Create Celebrate, Colleen from Lemon Thistle and Gemma from The Sweetest Diggs.

4-Thanksgiving-Entertaining-Ideas

This post is in partnership with Kitchen Stuff Plus. All expressed opinions are my own.
12:10:00 No comments
I can't believe it's the last week in our Modern Holiday Home Series. Thank you for following along. This week we've partnered with President's Choice to share some fun ways to entertain during the holidays.  If you're looking for easy Christmas appetizers and finger foods for your holiday party or just for dinner after a long day of Christmas shopping the appetizers in the PC® Insiders Collection™ helps you out with cooking and leaves you plenty of time for socializing.

easy-christmas-appetizers-finger-foods-PC-Insider-Collection

Does anyone else have appetizers for dinner? When my husband and I were first married (before we had kids) we would often make a bunch of appetizers and have them for dinner (I'm no chef). The other night after a long day, we decided to have appetizers for dinner again. We popped some PC® Mini Chicken Empanadas and PC® Dry-Rubbed Hardwood-Smoked Chicken Wings into the oven along with some baked brie.  I added some PC® Pomegranate Arils, pecans and honey to the baked brie and some rosemary to the empanadas to make a Christmas tree (my husband laughed, he thinks I take everything over the top).


A few of our wine glass broke in the dishwasher awhile ago so we picked up these great PC® Stemless Glassware as well. Side note, these puppy's hold a lot of wine.

easy-christmas-appetizers-finger-foods-PC-Insider-Collection

easy-christmas-appetizers-finger-foods-PC-Insider-Collection

If this is your first time learning of the Modern Holiday Home Series, it's a great series where 4 other Canadian DIY Bloggers and I share a holiday project each week for 5 weeks. You can catch up here; Week 1 Christmas Tote, Week 2 Deer Print Serving Board, Week 4 Lantern, Week 5 Holiday Decor).

Be sure to check out the other blogger's PC Insiders Collection projects this week.

The Learner Observer | The Sweetest Digs | Love Create Celebrate | Lemon Thistle
 
This post is in collaboration with President's Choice. All expressed opinions are my own.  
09:22:00 1 comments
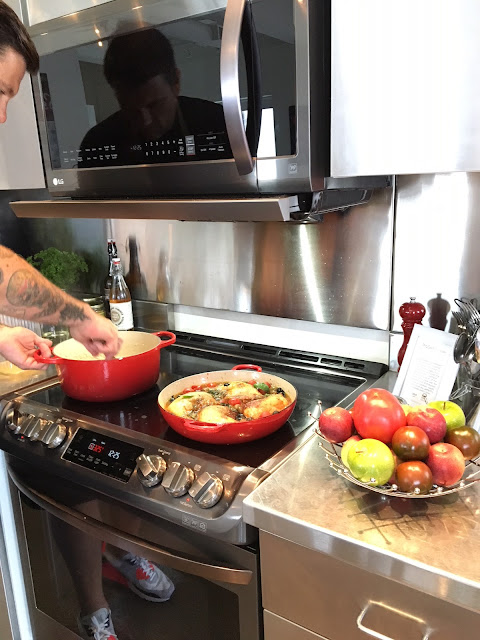
Have you ever wanted to learn how to shuck an oyster? A few weeks ago I had the privilege to learn how to do just that with Chef Chuck Hughes in the #LGKitchen.

Chuck Hughes is the Chef and Co-owner of Garde Manger and Le Bremner, located in Old Montreal, he is also a recurring judge on Chopped Canada. His enthusiasm for food is contagious and inspiring. Coming from someone like me who rarely goes beyond her wheelhouse (eg stir fry, baked salmon etc) his light-hearted candor and instruction really made me feel I could cook anything.

how-to-shuck-oyster-LG-Canada-Harlow-and-Thistle-8

Before we started Chef Hughes and I quickly chatted about the new LG Electric Slide-in Range with ProBake Convection™ in Black Stainless Steel while he whipped up a batch of the most delicious risotto I've ever taste. He mentioned he purchased the LG ProBake range for his new condo where they don't allow gas stoves and he loves it. I asked him if he missed cooking on a gas stove and he said no, now that he has kids, he feels safer with an electric range. No sticky little hands reaching up to grab the gas knobs and the LG range has a flat top which makes it super easy to clean.

How to Shuck an Oyster:
  1. Clean the outside of the oysters thoroughly with a scrub brush.
  2. Safety First (eg use a proper shucking knife don't attempt with just any knife).
  3. Fold a cloth in half and hold the oyster down, hinge facing out (the hinge is the part of the oyster that is fully attached).
  4. Push the knife into the hinge of the oyster (almost so the knife can stand on it's own) and turn the knife clockwise to pry it open.
  5. Run the knife along the side of the oyster skimming the top to cut the oyster away from the shell. Chef Chuck says this is an important step and one that really separates restaurant quality from home-shucking.  

Chef Chuck said that I did really well for my first try and that they could probably serve it in a restaurant... and then jokingly retracted "not my restaurant but a restaurant". It's those quips and laughs that really make him who he is and why everyone loves him. Such a treat to have this experience, thank you LG Canada.

Be sure to check out LG’s Black Stainless Steel collection at your favourite retailer during Black Friday, and throughout the holidays.

how-to-shuck-oyster-LG-Canada-Harlow-and-Thistle-8

This post is in collaboration with LG Canada. All expressed opinions are my own.  
22:28:00 No comments
Looking for a new way to use up all those juicy summer blueberries? Well here's a fool proof Blueberry Buckle recipe. It's foolproof because it's coming from the fool herself - seriously I have no baking skills whatsoever. When I was single I rarely used my oven, it actually caught on fire once because I forgot the instructions inside (yep, that happened).  Now that I have a family I find myself cooking and baking way more so when I figure out an easy/yummy recipe I feel compelled to share it on the blog.  Here's a quick and easy Blueberry Buckle Coffeecake recipe (really can you go wrong with blueberries, ever? Didn't think so.)


Streusle Topping Ingredients:
  • 1/3 cup sugar
  • 1/2 cup flour
  • 1 teaspoon ground cinnamon
  • 1/8 teaspoon salt
  • 1/4 cup butter
Cake Ingredients:
  • 2 cups flour
  • 2 teaspoons baking powder
  • 1/2 teaspoon salt
  • 3/4 cup sugar
  • 1/4 butter
  • 1 large egg
  • 1 teaspoon vanilla extract
  • 1/2 cup milk
  • 2 cups blueberries

Instructions:
1. Preheat the oven to 375°F. Lightly grease cake pan.
2. To make the streusel topping mix together all the ingredients. Cut the butter in with two knives until the mixture is crumbly. Set aside.


3. To make the cake, mix the dry ingredients (flour, baking powder, salt) together in one bowl.
4. Beat the wet ingredients (sugar, butter, egg and vanilla) together in another bowl.


5. Mix the dry ingredients into the wet mixture alternating between milk and the dry mixture.
6. Add blueberries. Stir only enough to blend.


7. Pour batter into the prepared cake pan. Sprinkle streusel on top.


8. Bake for 40 to 45 minutes


9. Remove the cake from the oven, and set it on a rack to cool for 10 minutes


10. Serve with ice cream and enjoy every bite.


14:23:00 No comments
Older Posts

Hello!


Hi! I'm Andrea, I'm a Designer, a momma and a hopeless DIY'er. My passion to achieve luxe for less led me to create Harlow & Thistle, a place to get home design inspiration and modern DIY home decorating ideas.

Email me to collaborate: harlowandthistle@gmail.com

SUBSCRIBE NEWSLETTER

Featured On

https://www.stylemepretty.com/living/2019/03/11/inside-harlow-thistles-mid-century-renovation-project/
 
https://houseandhome.com/video/blogger-harlow-thistle-budget-friendly-suburban-home/

https://www.styleathome.com/decorating/trends/article/the-hottest-design-trends-for-2017

Follow

Featured post

Modern Living Room Makeover

Popular Posts

  • DIY Gold Cake Stand
  • DIY Burlap Christmas Tree
  • DIY Holiday Ornament / Party Favour

Recent Posts

Created with by ThemeXpose